Tips for Using GEDmatch

[Updated 21 Nov 2023]

Tips for Using GEDmatch

GEDmatch is a popular website used by genetic genealogists and family historians who are incorporating DNA evidence into their family history research.  Common questions asked in genetic genealogy and family history user groups include: “What is GEDmatch?”, “How do I upload my DNA to GEDmatch?”, “How do I use GEDmatch once I have uploaded?”, and “What does it all mean?”.

GEDmatch processes autosomal DNA data files from different testing companies and other sources to enable effective comparisons between DNA kits.  The DNA file output (data and format) may differ slightly from different sources, so GEDmatch facilitates the direct comparison of all uploaded DNA kits… to ensure we are comparing apples with apples.

The tips below are intended to help beginners get started with the most common GEDmatch reports & tools, and to give them confidence to experiment with the more detailed utilities.

GEDmatch user interface

GEDmatch’s user interface is now device responsive – which means the website and tools work well and look good on mobile phones and tablets as well as on desktop browsers.

All the popular tools and features are still there and work just as they did before… it’s just that the pages look more modern and have a different layout.

The image below shows the new home page, where you can:

Feedback & Support

If you have any comments or issues with the new user interface, please provide feedback to GEDmatch via their Support Request form.  The link is found on the Dashboard page and also at the bottom of most other pages via the ‘Can we help you?‘ button.

The most popular GEDmatch Classic features still work the same way in the New version, but the dashboard and tool pages look a bit different.

What is GEDmatch?

GEDmatch.com is a free DNA comparison and analysis website for people who have already tested their autosomal DNA for genealogical purposes at one or more of:

…or tested for health, research or other purposes at any of the testing companies listed at right (from the GEDmatch upload form), or a custom file from other sources.

Testers download a copy of their autosomal raw DNA data file from their own testing company online account, and then upload the file to GEDmatch where it is processed and added to a large database.  GEDmatch then provides a range of matching and comparison reports, and other useful DNA tools and utilities.

Sources of DNA data in GEDmatch

Chart-DNA-Data-Sources-in-GEDmatch-byLouiseCoakley-21Nov2023
Image (c) Louise Coakley, Genetic Genealogy Pty Ltd (all versions from 6 May 2018 to current)

Although GEDmatch was originally designed for genealogical research purposes, the applications for genetic genealogy techniques have expanded and new uses may continue to be found, so you should be aware that others may use it for different purposes. 

Please read GEDmatch’s Terms of Service & Privacy Policy to ensure you are comfortable with potential uses, and if you upload data for other people, ensure you explain all potential uses of their data and receive their informed consent first.

GEDmatch features

  • DNA matching to relatives who have tested their autosomal DNA at any of the above companies and uploaded it to GEDmatch.  If you have only tested at one company, you may find matches to people who have tested at other companies.  Matches have email addresses – enabling direct contact, and some have uploaded family trees (Gedcom files).
  • Tools to compare and analyse DNA shared with others, including One-to-many DNA comparison, One-to-one DNA comparison, X-DNA comparison.
  • Admixture reports (ie. ethnicity/heritage predictions).
  • Shared Matches (People who match both or 1 of 2 kits), Parent Relatedness, DNA File Diagnostics, 3D Chromosome Browser, and Archaic DNA Matches.
  • Optional utilities for subscribers to Tier 1, which costs US$15 for one month, or US$100 per year.  Includes: filter feature on One-to-many reports, Segment Search, Phasing, Triangulation, Multiple Kit Analysis, Lazarus, My Evil Twin, Combined/Superkits, and Cluster Reports, AutoCluster, AutoTree, AutoPedigree, and finding surnames or Most Recent Common Ancestors from matches’ trees.

GEDmatch is very popular and it provides some useful DNA tools that you cannot get elsewhere.

First Steps

  • Register at GEDmatch.com (see step-by-step instructions with screens shots below, or follow the easy steps).
  • Download your autosomal DNA raw data file from your testing company (see step-by-step instructions with screen shots below).
  • Upload your autosomal DNA raw data file to GEDmatch (see instructions below).

How to Register at GEDmatch

For step-by-step instructions, click on the heading below to expand.  Click the heading again to close instructions.

To register a free GEDmatch account, go to https://gedmatch.com Click on the green JOIN FOR FREE button: 
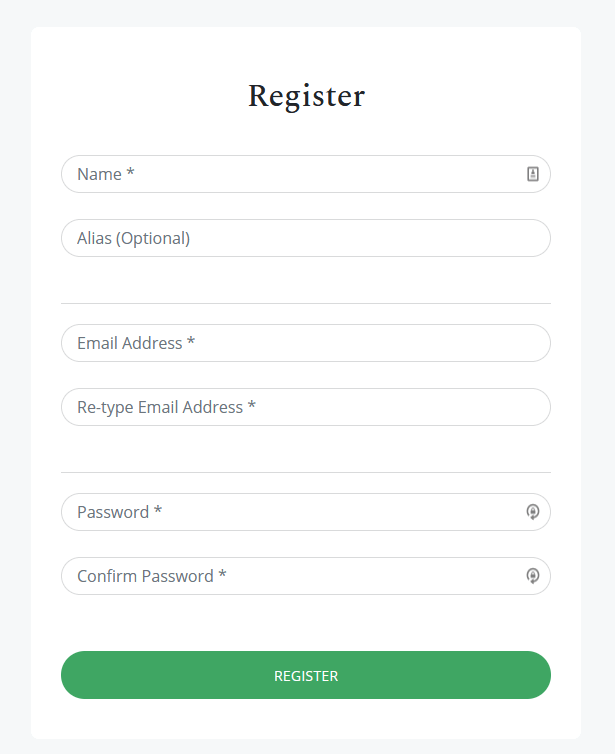
When the registration form opens, enter your real name, an alias (optional) to show instead of your real name (eg. nickname, initials, username at Ancestry), your email address and a password, then click the Register button: GEDmatch will then send an email to the address you just registered, which contains a confirmation code that you need to copy and paste into the box on your screen.  Check your email and paste or type the confirmation code into the box and click the Confirm button. Once registered, you can then return to the GEDmatch home page to login using your email address and password. 
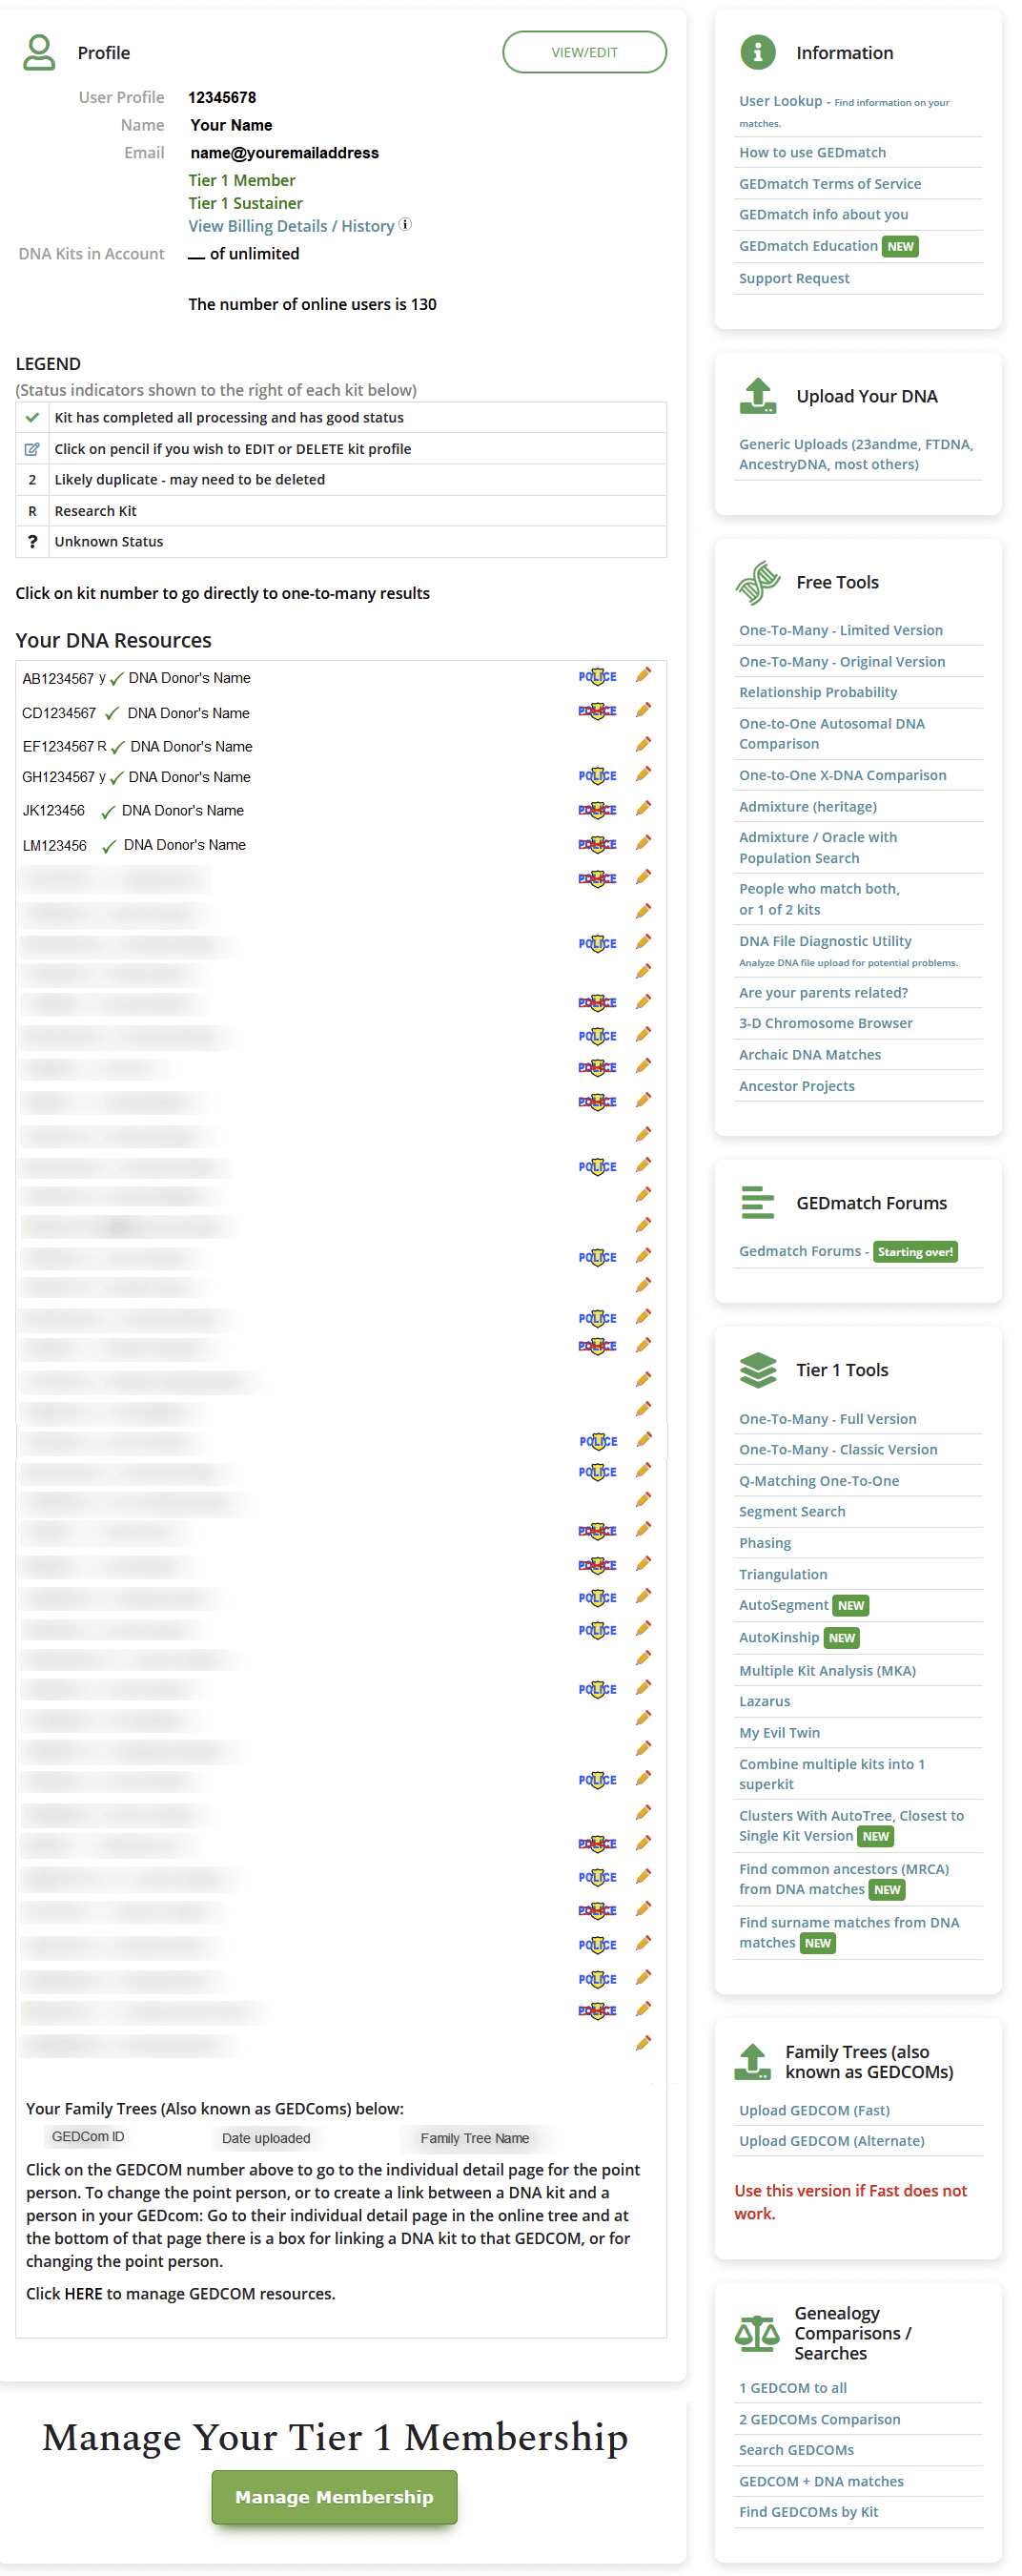
Once logged in you’ll be taken to the GEDmatch Dashboard (see Classic version below) where you can upload your DNA data file(s) and/or Gedcom family tree file(s) (see further below).

How to Download Raw DNA Data files

  • When downloading your raw data file from your DNA testing company account, select Save and leave the file zipped – don’t try to Open it (it contains approximately 700,000 rows of numbers and letters); Some browsers unzip downloaded files by default (eg. Safari on Macs), in which case you’ll need to edit the browser settings.
  • The downloaded autosomal DNA file will be about 6MB in size when zipped, or 18MB in size if unzipped/opened.  WeGene users must compress/zip their raw data file first.

For step-by-step instructions, click on the relevant heading below to expand.  Click again to close instructions.

Sign-in to your Ancestry account.

Click on the DNA tab at the top of the page:

Click on SETTINGS near the top right of the page:
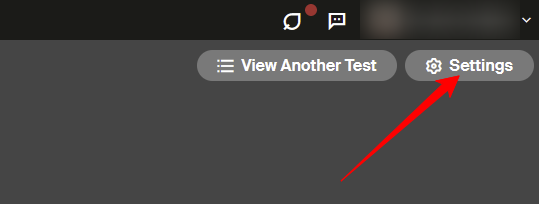
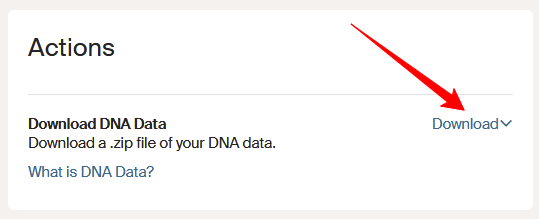
Scroll down the page and click on Download Raw DNA Data:

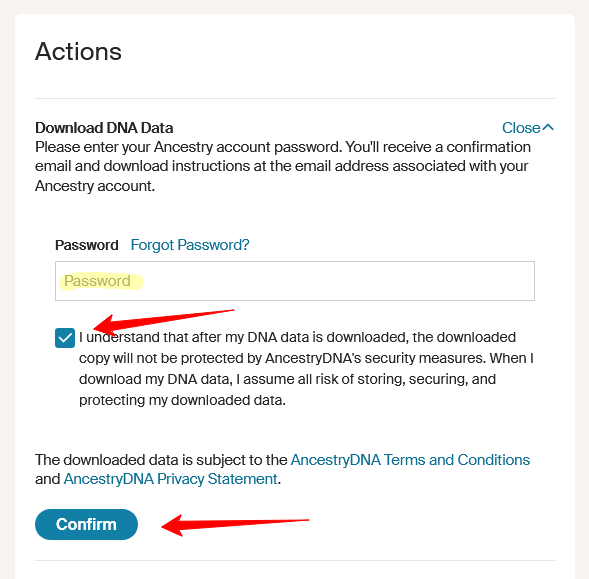
Enter your password, tick the checkbox to acknowledge you’ve read the download notice, then click on CONFIRM:

Check your email for a message from Ancestry.

Click the link in the email to download your data and save the file to your computer. Leave it zipped (ie. save it, don’t open it).

TIP! If you manage data for multiple family members, it is best to create a separate folder for each person so their DNA data files don’t get mixed up.

Sign-in to your Family Tree DNA account. You can find the DNA data download link via either:
  • The top menu… click on Results & Tools > Autosomal DNA > Download Raw Data, or
  • The Family Ancestry section… click on See More > Data Download
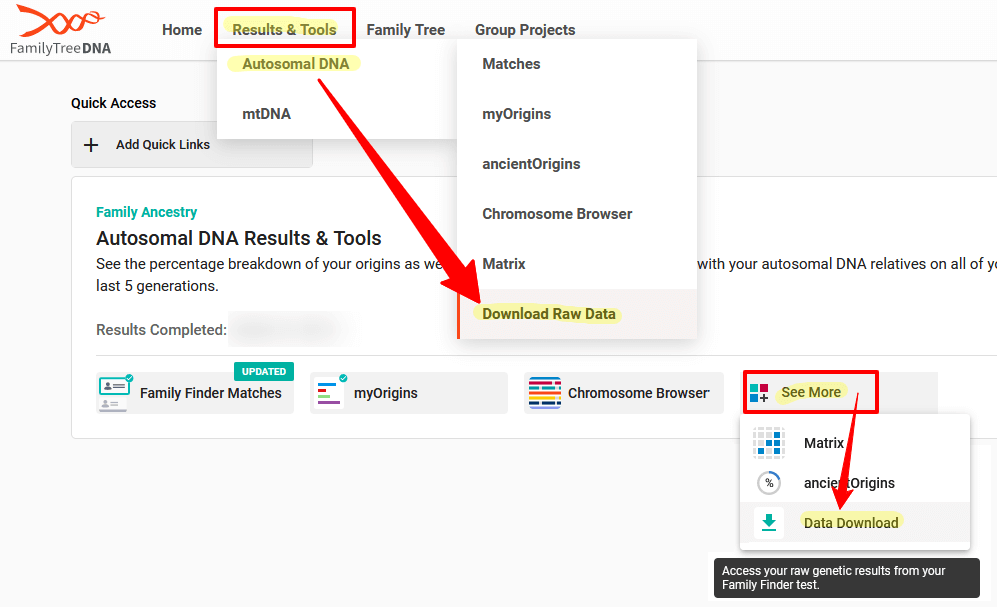
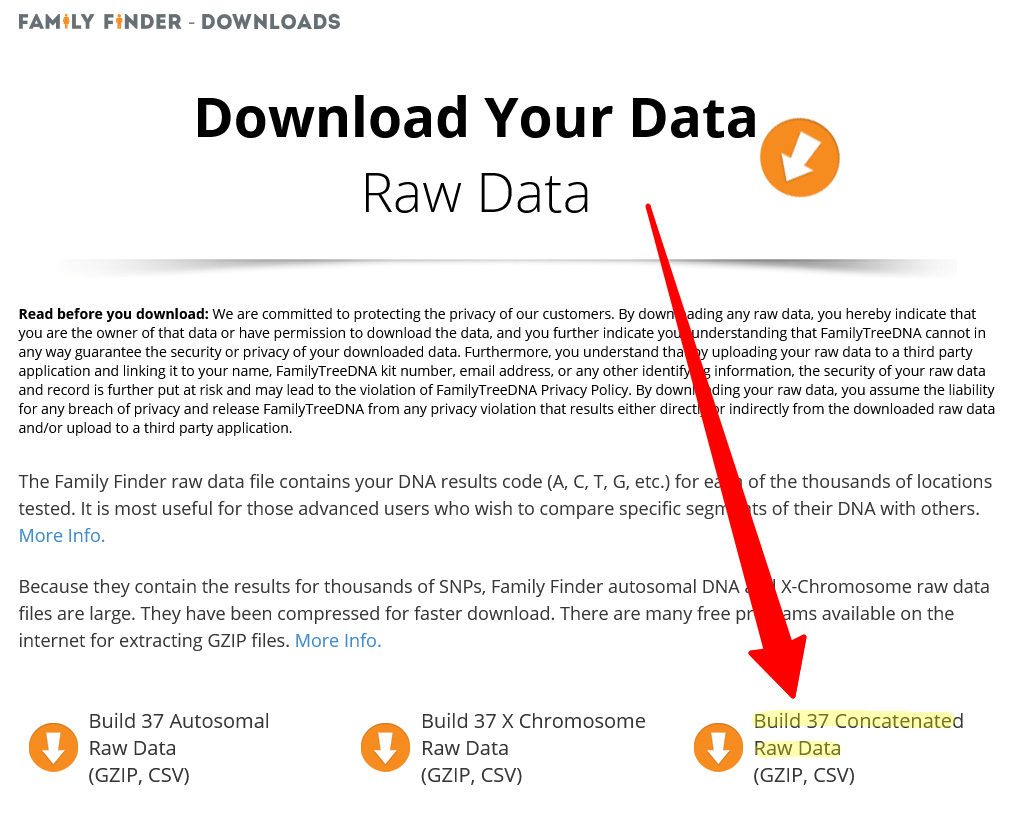
    Click on the Build 37 Concatenated Raw Data file to Save it to your computer or cloud storage: (Note: leave it zipped, ie. save it, don’t open it):     TIP! If you manage data for multiple family members, create a separate folder for each person so their DNA data files don’t get mixed up.

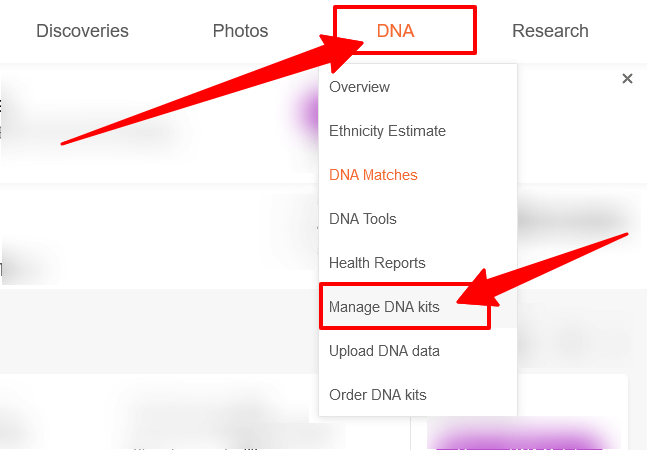
Sign-in to your MyHeritage account

Hover over the DNA menu tab and click on Manage DNA kits:

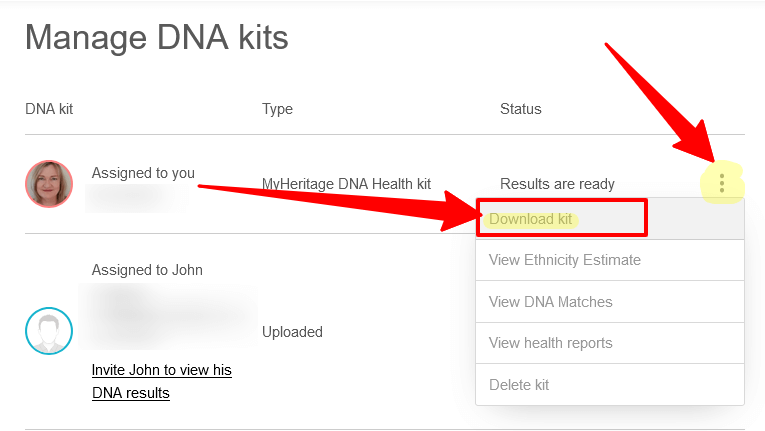
Click on the three dots to the right of your kit, then click on Download kit:

Read the popup then scroll down and click CONTINUE.

Tick the checkbox to acknowledge you have read the download notice, and then click CLOSE.

Check your email for a message from MyHeritage.

Click the email link to download your data file and your browser will open again

Enter your Password and click DOWNLOAD, select a location and click SAVE (leave it zipped, ie. save it, don’t open it).

TIP! If you manage data for multiple family members, create a separate folder for each person so their DNA data files don’t get mixed up.

Sign-in to your 23andMe account.

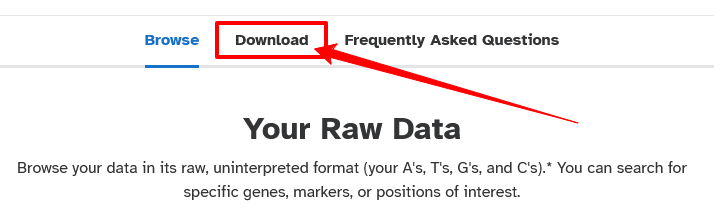
Click on the drop-down arrow next to your profile picture & name near the top right, and then click on Browse Raw Data:

Click on the Download tab:

Scroll down and click on Submit request to download your raw data:

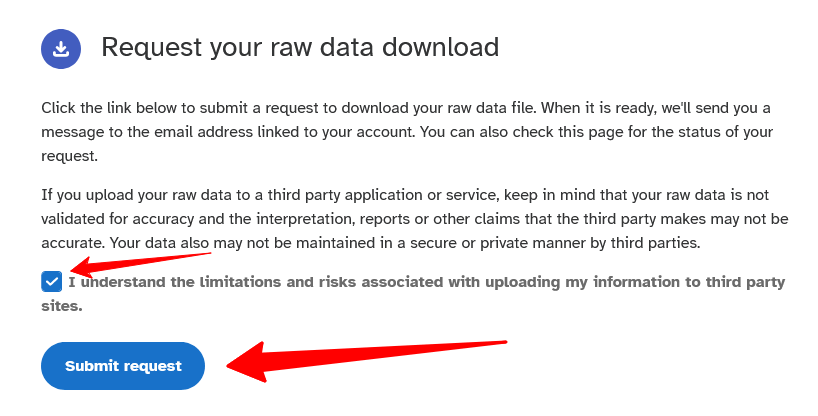
23andMe will email you when the data file is ready to download

Click the link in the email to download the data file, and save it to your computer.

TIP! If you manage data for multiple family members, create a separate folder for each person so their DNA data files don’t get mixed up.

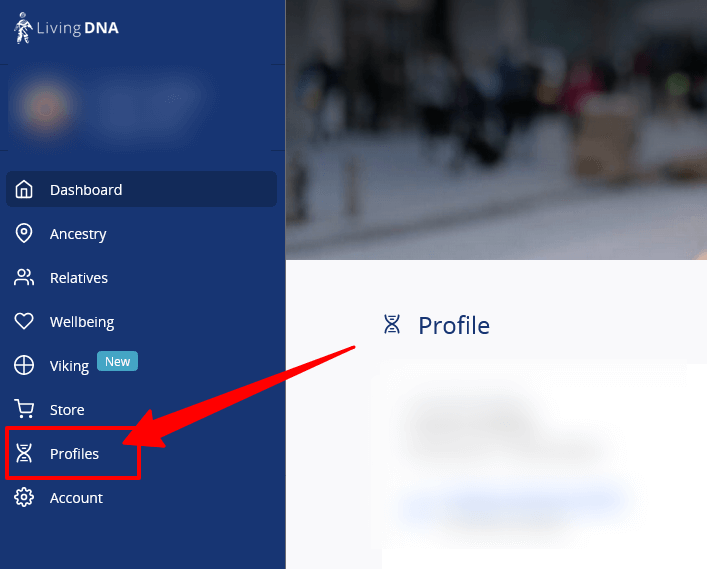
Sign-in to your Living DNA account.

Click on the Profiles tab on the left menu:

The Profile page lists all the DNA kits in your account.  Either click on the little blue Download icon to the right of the profile you want to download, or click the little blue arrow at the far right to go to the profile detail page:

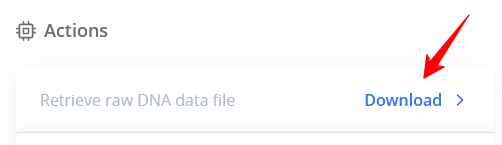
If you clicked through to the Profile detail page, scroll down and click on the Download link towards the bottom:

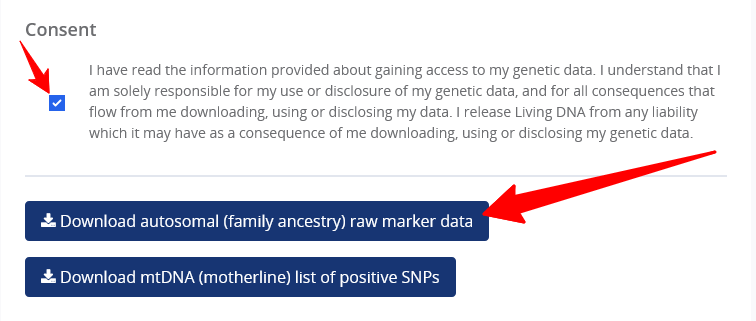
The next page will display Privacy information for you to read and agree to.  If you are happy to continue, scroll down and tick the checkbox to provide your consent, and two dark blue buttons will then become active.

Click on the button labelled Download autosomal (family ancestry) raw marker data and save the file to your computer:

TIP! If you manage data for multiple family members, create a separate folder on your computer for each person so their DNA data files don’t get mixed up.

GEDmatch Dashboard

Once you have registered at GEDmatch, each time you login you will be taken to the GEDmatch Dashboard (ie. the main home page when you are logged in) – see the image below.

Familiarise yourself with the section headings, as they will help you find everything you need.

The section near the top left contains your user information, including your name, email address, member status, a link to update your details, and it displays the number of users currently online.  If you have already uploaded any DNA data files, you’ll see the LEGEND box on the left, and a list of your uploaded DNA kits below that.

The section on the right contains links to Information, links to Upload your DNA, links to Free Tools (reports and tools), GEDmatch Forums, Tier 1 tools (US$10-15 monthly depending on billing basis, or US$100 per year; they will appear grey and unclickable if you are not a Tier 1 subscriber), and links to upload Gedcom Family Tree files and run Genealogy Comparisons & Searches on those trees.

At the bottom of the page are the instructions to either manage your membership or subscribe.

TIP!  If you ever need to contact GEDmatch, click the Support Request link near the top right of the Dashboard page under the Information section or click the Contact Us button at the bottom of each page or report.  Or you can contact [email protected].

GEDmatch Dashboard as at 9 Oct 2022

How to Upload DNA data files to GEDmatch

For step-by-step instructions, click on the heading below to expand.  Click the heading again to close instructions.

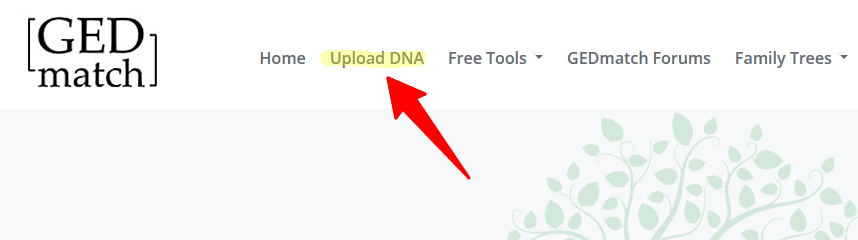
Sign in to GEDmatch.

On the top menu (or hamburger menu on a mobile device), click on Upload DNA:

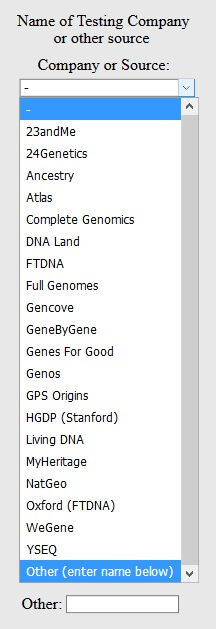
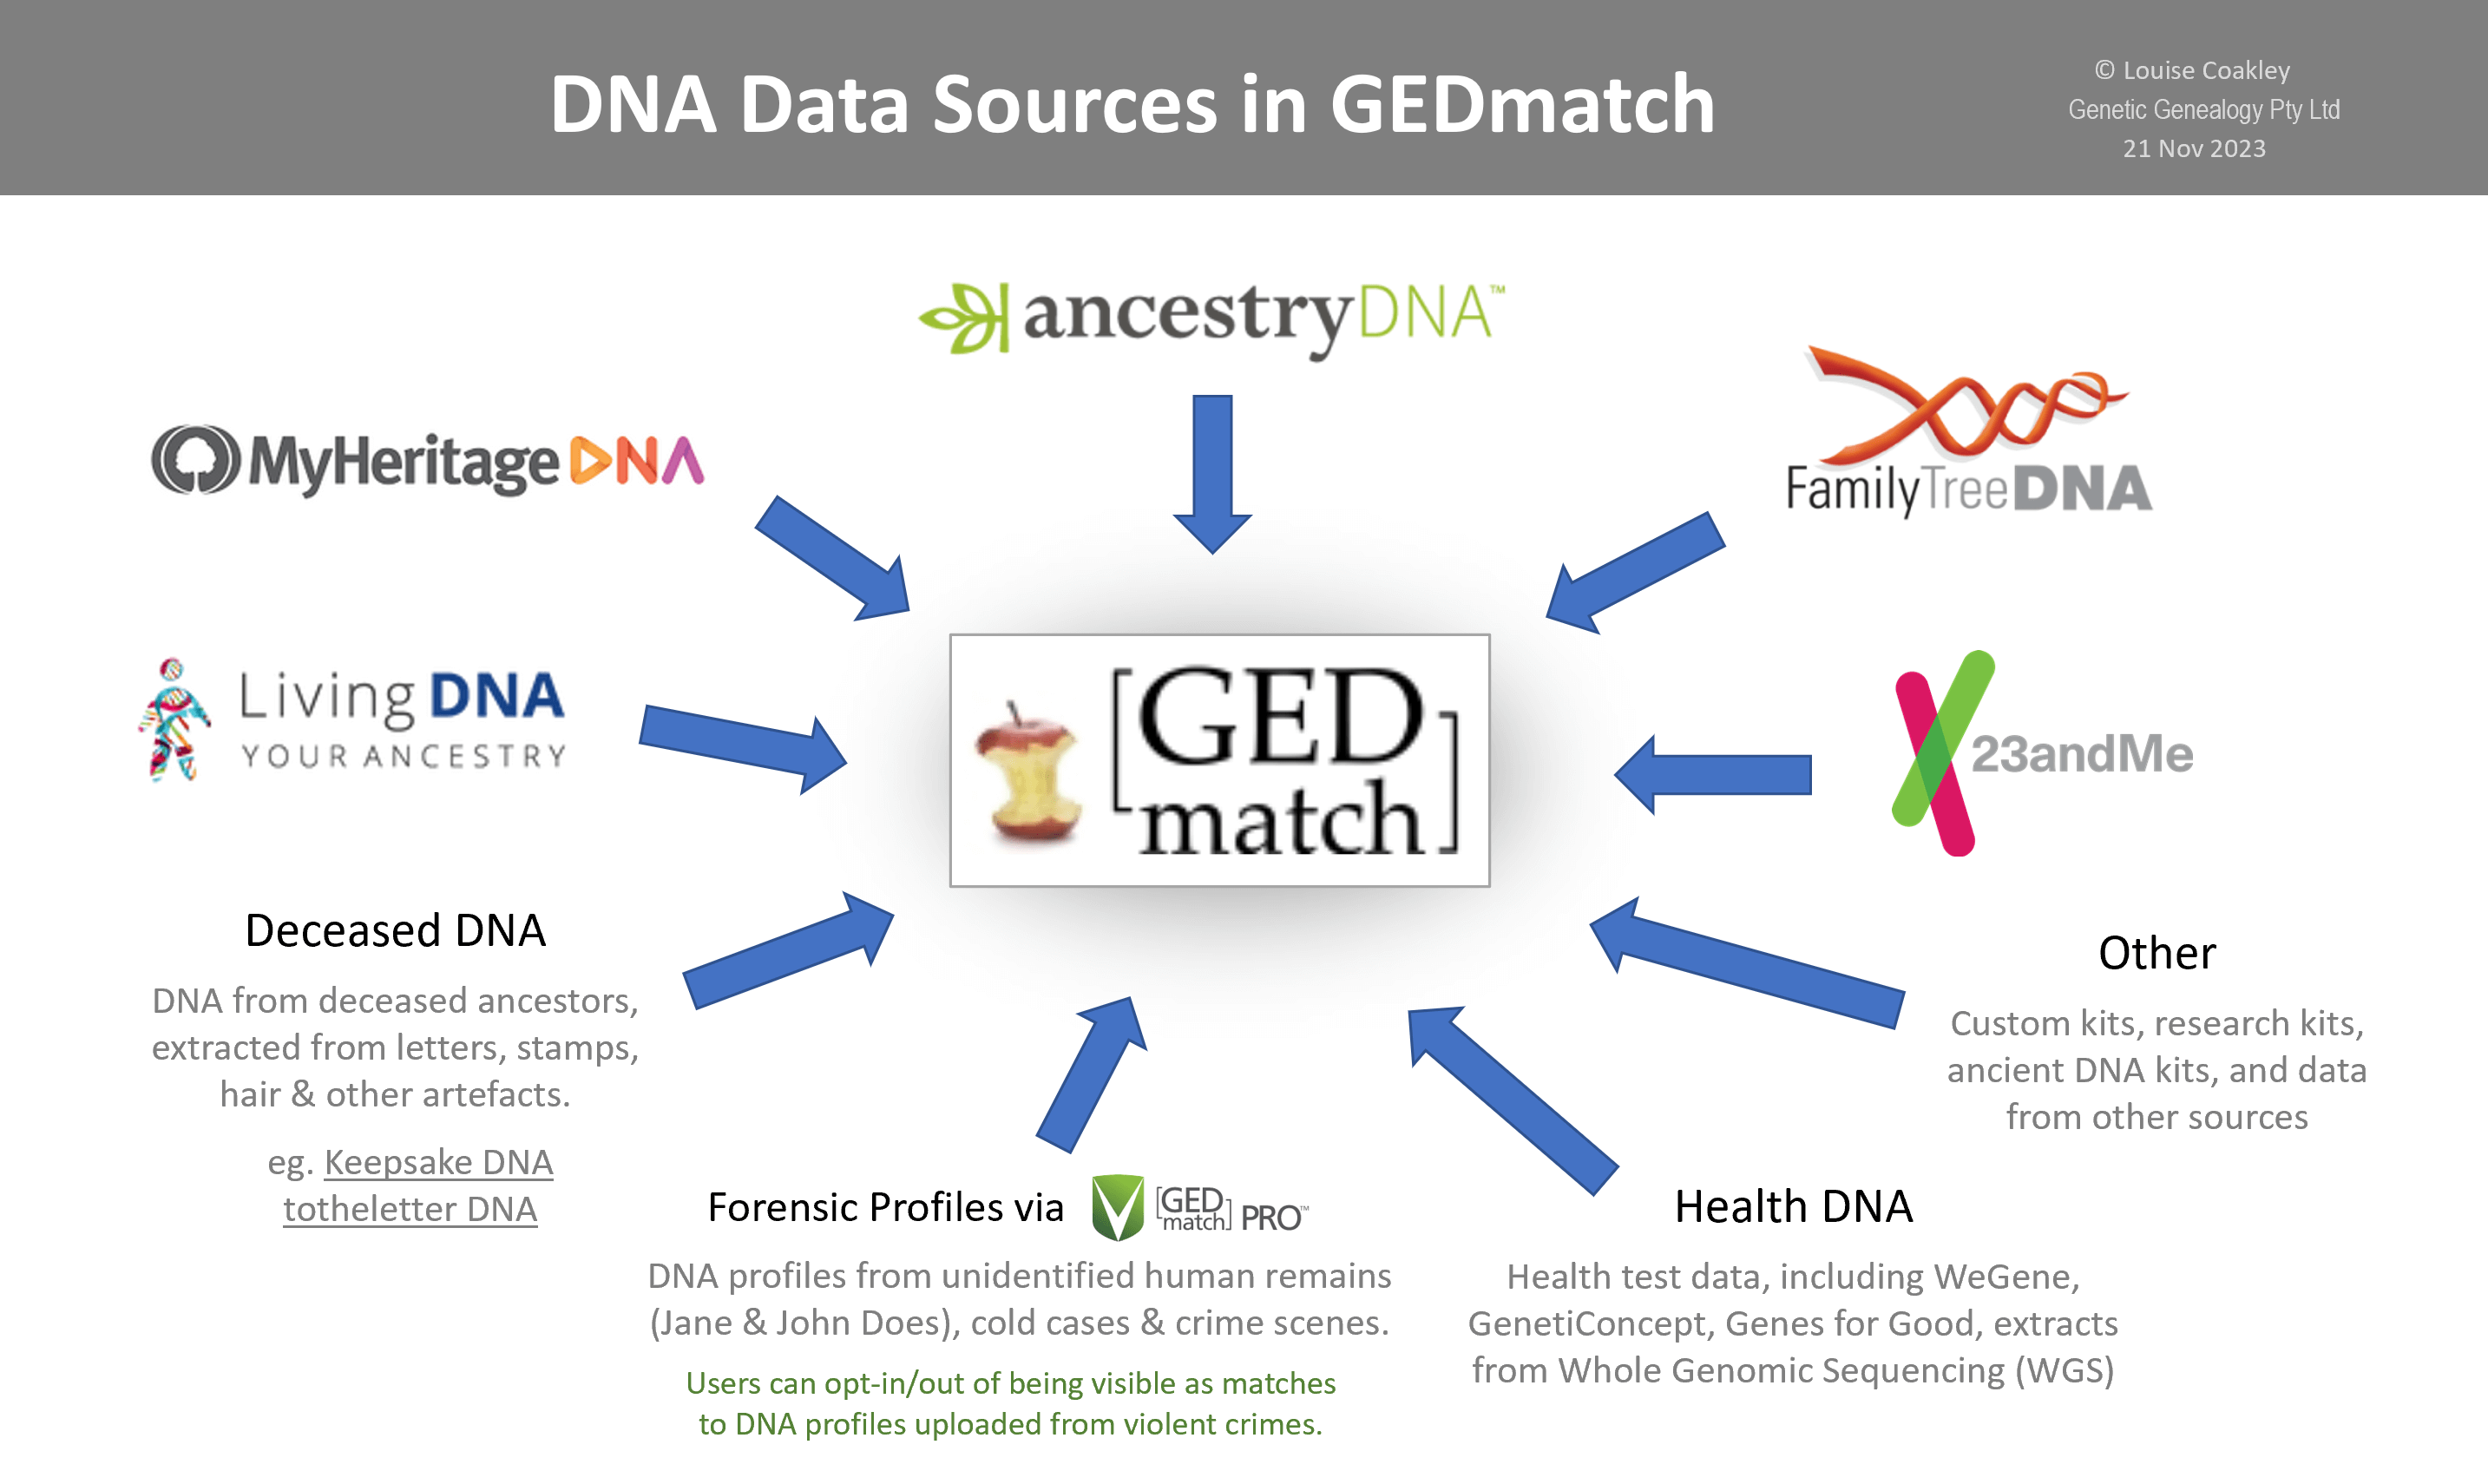
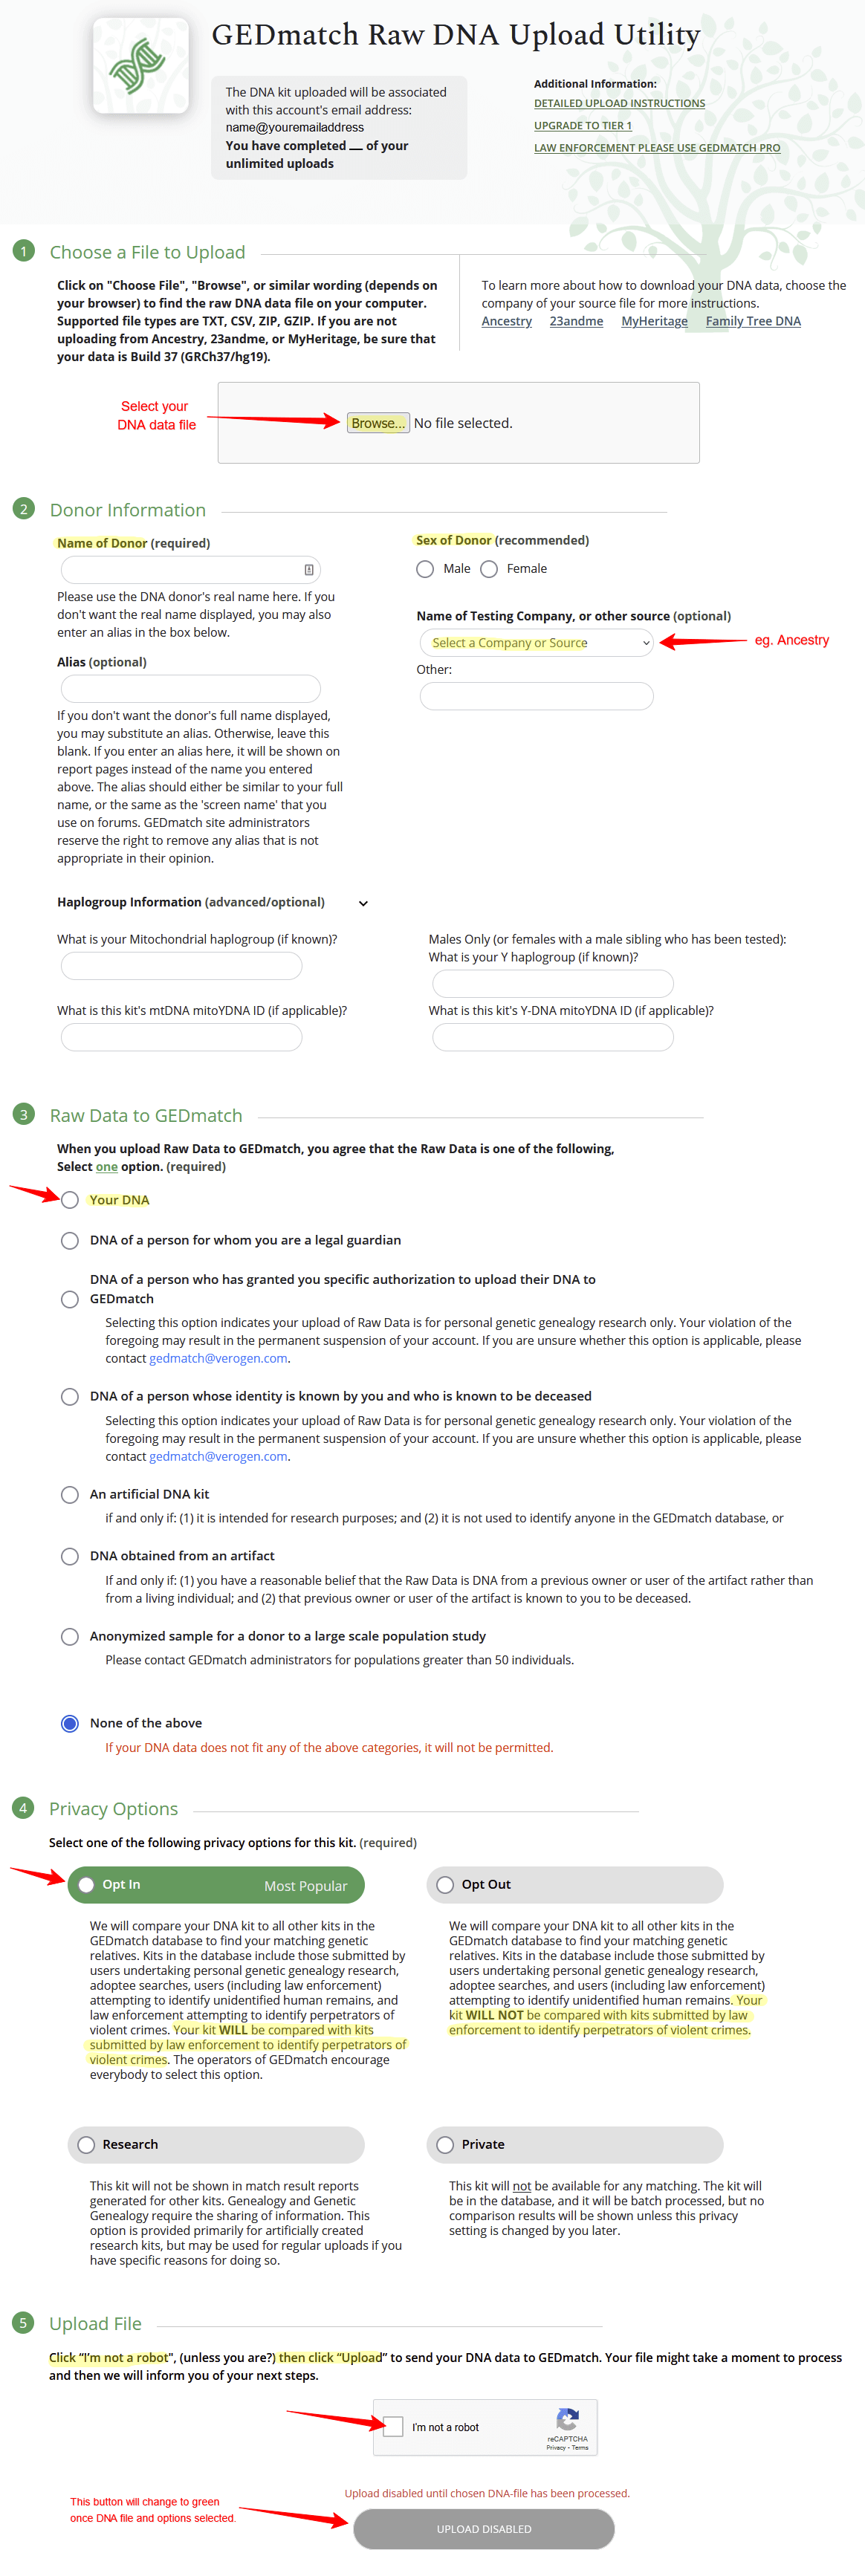
On the Upload Form, shown below, enter your tester’s details: their name; alias (optional); sex; haplogroups (optional; only applies if Y-DNA &/or mtDNA tests done and haplogroups known); DNA source (eg. testing company); DNA origin & authority; and kit privacy option.

Then click on the Browse button near the bottom, locate and select your saved DNA data file that you downloaded earlier (check the name and date).  Once selected, you’ll see the file name listed on the form next to the Browse button.

Then click the Upload button, on the next screen tick the ‘I am not a robot’ reCAPTCHA checkbox, and click on the Proceed with processing button.

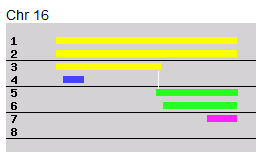
On the next screen you’ll watch the progress as each chromosome number appears, and if all goes well you’ll see ‘Finished’, and your new GEDmatch kit number displayed in red, which will now also be listed on your dashboard page under Your DNA Resources.

Read the information shown about processing time, and then to return to the Home/Dashboard page answer the question at the bottom of the screen to acknowledge that you understand that processing may take up to 2 days to complete, then click Submit Answer.

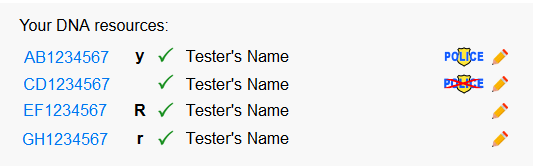
While your kit is still being processed, the status indicator will show a special symbol (check the legend), during which time you can use only a limited selection of tools.  Expect the processing to take up to 48 hours, but it can sometimes be ready much sooner.

A green tick next to a kit number indicates it has completed processing and is ready to use.

You can upload multiple DNA data files to your GEDmatch account.

GEDmatch Kit Numbers

Once a DNA data file has successfully been uploaded to GEDmatch, the test’s kit number, status indicator and name will appear in the Your DNA Resources section on the left side of your GEDmatch dashboard beneath the Legend.

GEDmatch kit numbers are randomly generated upon upload.

  • Current GEDmatch kit numbers commence with two random letters followed by seven digits.
  • Kit numbers migrated from the original/legacy GEDmatch to Genesis still retain their original kit number (one letter followed by six digits).
  • Combined kits, aka Superkits, start with two random letters, have six numbers and end with ‘C1’.

The first letter of migrated kit numbers can be indicative of the test’s origins:

  • AncestryDNA kit numbers start with ‘A
  • 23andMe kit numbers start with ‘M
  • Family Tree DNA kit numbers start with ‘T
  • MyHeritageDNA kit numbers start with ‘H
  • WeGene kit numbers start with ‘W
  • GenetiConcept kit numbers start with ‘E
  • Genes for Good kit numbers start with ‘G
  • Generic or custom kits start with ‘Z‘ (Note that there was a test period in late 2016 to early 2017 when all new kits uploaded via the generic link were allocated a ‘Z’ prefix, so you will find some regular FTDNA, Ancestry and 23andMe kits with ‘Z’ prefixes).

Kit Profile Management

Once you have uploaded your DNA file and you have been allocated a kit number, your DNA kit will show in the left column of your Dashboard page, under the heading Your DNA Resources.

You can edit your kit settings or description at any time, and remove a kit or transfer it to another user’s account.  You can edit your kit’s visibility, eg. from Public to Research or to opt-in or opt-out of matching to law enforcement kits related to violent crimes by clicking on the little pencil edit icon to the right of your kit number to access the Kit Profile Management page.

For kits that are set to Public, there is a one-click icon to easily opt-in or opt-out of law enforcement matching (LEM) visibility to samples from violent crimes (ie. murder, nonnegligent manslaughter, aggravated rape, robbery, or aggravated assault).  The two Police icons are shown below – one with a red cross through it (opted out, not visible as a match if related to law enforcement violent crime kits), and one with no cross through it (visible as a match if related to law enforcement violent crime kits).  One click on either of these Police icons will switch it to the other option.  Kits with no Police icon are not set to Public visibility, so any changes would need to be made by clicking on the pencil Edit icon to open the Kit Profile Management page (see below).

You can opt-out of having your kit visible as a match to samples related to violent crimes, but samples from unidentified human remains (eg. Does) will be included in the main public database to potentially be matched to all kits (you will not see any LE kits or matches).

If you are uploading your DNA to GEDmatch specifically to help with the identification of unidentified human remains and/or perpetrators of violent crimes, follow these easy step-by-step instructions.

The Kit Profile Management page is shown below, including the details you can view or change, and the setting for law enforcement matching highlighted:

On the Kit Profile Management page shown above, note the two blue tabs at the top… Kit Removal and Kit Transfer.  This is where you go to delete your kit, or transfer it to another GEDmatch user (see below).

How to remove a GEDmatch kit

To delete a DNA kit from GEDmatch, click on the pencil Edit icon next to the relevant kit number on the dashboard page to open the Kit Profile Management page.

Click on the Kit Removal tab (highlighted below).  Enter your GEDmatch password and click on the Delete button.

How to Transfer a GEDmatch kit to another user

To transfer a GEDmatch kit from one user’s account to another GEDmatch user’s account, click on the pencil Edit icon next to the relevant kit number on the dashboard page to open the Kit Profile Management page.

Click on the Kit Transfer tab (highlighted below).  Enter your password, enter the email address of the new GEDmatch kit administrator, and click Transfer Kit.  The transferred kit number will then appear in the new administrator’s GEDmatch account.

How long does GEDmatch processing take?

While your uploaded kit is being processed, the status indicator next to your DNA kit under Your DNA Resources will show a round-shaped/person symbol, during which time you can use only a limited selection of tools.

Expect the processing to take up to 48 hours, but it can sometimes be ready much sooner. GEDmatch’s upload completion page states that batch processing usually starts at about midnight EST and takes about 7 hours to complete – however sometimes it can take up to 2 days to complete.

A green tick next to a kit number indicates it has completed processing and is ready to use.

The report most people are keen to run first is the One-to-many matches report to look for new matches that they don’t have a their testing company, but you do need to wait for processing to finish before you can run One-to-many reports.

While waiting for your kit to finish processing, you can run the One-to-one Autosomal DNA Comparison report, the Are your parents related? report, and some Admixture (ethnicity) reports.

You can also Search all GEDCOMs to look for names or places of interest in other peoples’ family trees, and through those find some kit numbers that you can try out in the One-to-many matches and other reports.

Are your parents related?

For most testers this report will be unremarkable, as per the first image below. 

The Are your parents related? report will reveal if the tester’s parents were related in very recent generations.  Similar to regular autosomal DNA match statistics, it does not always show if your parents were related more distantly – such as 3rd, 4th cousins or further back, but will clearly show closer relationships.

If your parents shared an ancestor recently, they will have both inherited one or more of the same segments from that ancestor, and both have passed one or more of those same segments on to you.  Matching segments you inherited from both of your parents will be highlighted in this report.

Refer to the colour-coded Legend at the top of the report:

A typical result for a tester with unrelated parents will look similar to the example below – mostly red (non-matching) with some small isolated green stripes or clumps (matching but too small, not forming long continuous segments).

The report extract below is from a tester whose parents were 1st cousins.  Note the continuous green (matching) segments underlined by bright blue to indicate segments longer than 7cM.  Chromosomes with matching segments include a table showing position information.  The total cMs shared will be at the bottom of the report.  In this example, the total is approximately 220cM, as the parents were 1st cousins to each other, so the child is effectively his/her own 2nd cousin.

Enter your own kit number.  If your parents are or were related in very recent generations, you will see blue blocks (similar to above) indicating identical DNA segments of more than 7 cMs inherited by you from both of your parents.

If your parents were related, information on the total shared cMs, largest segment, and estimated number of generations to the Most Recent Common Ancestor (MRCA) will be shown at the bottom of the report, along with resources to obtain additional information or support if necessary.

Admixture Utilities

GEDmatch provides dozens of different Admixture calculators, accessible from two links on the dashboard – Admixture (heritage) and Admixture/Oracle with Population Search.

Experiment with the different projects, outputs and calculators, and read and follow the additional resource links displayed in the report.  Select options similar to or including your expected heritage to get more meaningful results.  If you select projects focused on an ancestry that you don’t have, you may get strange results as it tries to fit you into population groups that you don’t have.

You can produce a wide range of charts showing ancestry estimates using different projects, reference samples and different outputs:

Admixture - Eurogenes K13

The Admixture/Oracle with Population Search option allows you to select a calculator that contains a specific reference population by searching for a string of characters in the population name (eg. ‘austral’, ‘british’, ‘swed’). 

Experiment with the different projects, calculators and Oracle options.  To start, if you have European origins you may like to try Eurogenes K13, for a more general overview try Dodecad World 9, MDLP K16 Modern or MDLP World-22, for Jewish ancestry try the Eurogenes Jtest, and for Asian origins try the HarrappaWorld project.  The number in the calculator name indicates how many reference populations are included in that calculator, so the higher the number, the more reference populations are included in the resulting table and pie chart.

Below is an example of the chromosome painting utility:

Eurogenes K36 Chromosome Painting

For more information, refer to ISOGG Wiki’s Admixture analyses guide and Eupedia’s distribution maps and population acronyms (eg. ANE = Ancient Eurasian, WHG = Western European Gatherer, ENF = Early Neolithic Farmer etc).

For a detailed explanation of how to select and understand the various Admixture & Oracle reports and their options, read the History Chick’s Finally! A GEDmatch Admixture Guide!

Margaret O’Brien has summarised the best Admixture calculators to use based on your ancestral heritage, and written individual posts on the: Dodecad Project, Eurogenes Project, MDLP Project, Ethiohelix Project (for African Ancestry), HarappaWorld Project (South Asian Ancestry), PuntDNAL Project and the Gedrosia Project.

Find Matches with One-To-Many DNA Comparison

Once your kit has finished processing, you will want to run this most popular report to see if it identifies any new or closer matches to you, which can be very enlightening if you have only tested at one of the DNA testing companies for genealogy.

Run this report by either clicking on your kit number on the Dashboard, or by clicking on One-to-many DNA Comparison under DNA Applications.  Enter your kit number and click Display Results.

One-to-many-Basic

Below is an example of the One-to-many DNA Comparison report.  Don’t be deterred by all the numbers and perceived complexity that might imply… you will understand it and get the hang of it quite quickly!

GEDmatch has compared your autosomal DNA data to every other kit in the database, and listed the kits that share some DNA with you, with the closest matches at the top:

Familiarise yourself with the report headings while looking at your top matches:

  • Kit – Recent kit numbers are random, but check the kit number in case the first character indicates the testing company of the match (only applicable to older kits migrated from the original GEDmatch database; refer to GEDmatch Kit Numbers section above). Kit numbers shaded in green are newer matches within the last 30 days: the shades gradually fade from dark when new to paler green.
  • Select – Tier 1 subscribers can select the checkbox next to 3 or more kits of interest and then click on the Visualisation Options button (just above the headings) to select from a range of cross-kit visual analysis tools.
  • 1:1 – Click on the ‘A‘ next to any kit to run the One-to-one Autosomal DNA Comparison report for that kit to compared to your kit.
  • Name is the match’s name or optional alias (eg. initials, nickname, username).  An asterisk (*) in front of a name means it was entered as an alias.  If there is no asterisk (*), the real name is shown (presuming it was entered correctly).
  • Email address of the match or their kit administrator.
  • Largest Seg is the size in cMs (centiMorgans, the measure of genetic distance) of the longest individual segment of shared DNA.
  • Total cM is the total amount of shared DNA (centiMorgans, the measure of genetic distance) which is used to estimate the possible relationship.  Enter the total cM amount into DNA Painter’s Relationship Calculator to see the various possible relationships consistent with this amount of shared DNA.
  • Gen is the estimated number of generations back to the Most Recent Common Ancestor (MRCA), eg. 2.0 gens is consistent with a 1st cousin because it is 2 generations back to your shared grandparents, or it could be another relationship that shares the same amount of DNA as a 1st cousin; 3.0 gens is consistent with a 2nd cousin or equivalent relationship, and so on (Tips on why ‘Gen’ is only an estimate).
  • Overlap is the number of SNPs in common that were able to be compared between the two kits (as different companies examine different SNPs, not all overlapping); Results highlighted in shades of red or pink are a warning that the overlap is lower than desirable for an accurate match result (darker is lower/worse).  Read What is Overlap on GEDmatch? by Margaret O’Brien explaining in detail about SNPs, chips, and overlap when comparing DNA kits.
  • Date Compared is the date the Overlap was calculated.  Kits migrated from the original GEDmatch will show N/A (not applicable).
  • Testing Company is where the DNA was tested.  Kits transferred from the original GEDmatch will show ‘Migration’ followed by a version number (eg. F2, V3, V4) and a letter indicating the testing company (A=Ancestry; M=23andMe; T/F=FTDNA; H=MyHeritage).

What to look for...

  • Top Matches:  Check the matches at the top of the list, as these are your closest matches, ie. your closest genetic relatives in the GEDmatch database.  Generally, the more cMs you share, the more closely you are related (see more on this below).  Note the total amount of shared DNA in cMs, and enter it into the free Relationship Calculator at the DNA Painter website to learn the potential relationships consistent with that amount of DNA.  Closer relationships will include much larger individual segment sizes, so also observe the Largest Segment size to ensure your match is not sharing only one segment with you (lots of small segments with no larger segments in the total cMs may indicate endogamy and make the relationship appear much closer than it really is).

    To demonstrate, below I’ve extracted a small section from the top right of the One-to-many report results shown above:  First I check the Total cM column and observe that the top match shares quite a good amount:  182cM could be a low-sharing 2nd cousin, a half 2nd cousin, a high-sharing 3rd cousin, a 2nd cousin once removed, a half 1st cousin once removed, another possible relationship or even a combination of more than one relationship (eg. where there is more than one set of shared ancestors).  The largest segment size is good at 64cM, so I am not worried about it being an endogamous match.  The last column indicates that the top match tested at Family Tree DNA (an early tester indicated by the ‘F’).  The second-highest match tested at AncestryDNA and is in a similar relationship range to the top match, sharing 174cM.  The third-highest match, sharing 91cM, tested at MyHeritage DNA, has a lower overlap (so caution required: check the potential relationships for 91cM).

  • New Matches:  Return to GEDmatch and run this report regularly, as this is where new matches will appear as more testers upload their raw data, and there is no alert for new matches (unless a new match emails you directly).  Scan your match list for new matches with kit numbers highlighted in shades of green (ie. less than 30 days old).
  • Check the Testing Company column and the Kit number prefixes of your closest matches to see if you have close matches at a company you haven’t tested at, as close matches may indicate that you should test there as well.  Only a small percentage of testers from each company actually upload to GEDmatch, so you may be missing out on some better or worthwhile matches.  As mentioned previously, recent and new kit numbers are all random, but the first letter of older kit numbers may indicate the testing company (A=Ancestry; M=23andMe; T or F=FTDNA; H=MyHeritage).
  • Look for kits from your own testing company that you either haven’t noticed before or they do not appear in your testing company’s match list.  For example, you may have matches with FTDNA testers that don’t appear in your Family Finder matches.  This can occur if the total shared DNA or the largest segment size is less than than the testing company’s threshold.  You may also see AncestryDNA kits that don’t appear in your AncestryDNA matches, as AncestryDNA uses a filter (called Timber) which may remove some matches. Or the match may have turned off matching visibility.  Or you may just have never noticed a particular match before… so you now know to go and look for it in your testing company match list, to explore shared matches, look for a linked tree, and to check the user profile and for any other useful information.  Sometimes matches have a tree (GED or Wiki) on GEDmatch but no tree at their testing company.
  • Email addresses:  You might find an email address for a match you have not had success in contacting via a testing company’s messaging system.

Total centiMorgans (cMs)

  • The total amount of shared DNA is measured in units of genetic distance called centiMorgans (cM) and this is used to estimate your relationship to your match.  Generally, the more cMs you share with a match, the more closely you are related.
  • It is useful to understand and remember the theoretically expected amounts of shared DNA for the most common relationships (see chart below, extracted from ISOGG Autosomal DNA Statistics).  Read the information at the top of the page (about testing company differences, adjustments for X-DNA, and formulas you can use to convert cMs into percentages), and scroll down to review the three different relationship charts, and read the introduction to the Shared cM Project.
ISOGG Wiki: Theoretically-expected amounts of shared Autosomal DNA
https://isogg.org/wiki/Autosomal_DNA_statistics
  • In real life, the observed amounts of shared DNA for known relationships can vary quite widely from the hypothetical amounts shown above, so it is essential to understand that and never take any predicted relationship for granted based only on the cMs.  You must explore all possible alternative relationships that are consistent with the same amount of shared DNA, cross-compare with other tested relatives, explore shared matches, consider target testing if required, and do thorough genealogical research to confirm or disprove relationships.

One-to-Many

The One-to-Many report allows a range of selection/filter options, more match information and useful filtering of results.  Simply enter your kit number in the box near the top, and click on the green Search button to run the report using the default settings.

Click to enlarge image

Selection/Filter options

  • Choose between Autosomal DNA or X-DNA matching
  • Apply offset limits to omit a number of the top matches, eg. offset 100 = starts your match list at 101
  • Limit or increase the number of matches in your results list up to 3000 (Tier 1 subscribers can increase up to 100,000 matches)
  • Adjust cM threshold size – the default is 7cM
  • Tag Groups can be selected (learn more about Tag Groups)
  • Overlap cutoff allows you to omit matches who don’t overlap enough common SNPs

Match Information – in addition to what is included in the Basic version:

  • GED/WikiTree – link to an uploaded Gedcom family tree or to a WikiTree
  • Age (days) since match uploaded to GEDmatch
  • Type – Combined kits = 258
  • Sex – limit your results to M or F or U
  • MtDNA and Y-DNA haplogroups: self-reported by the match (optional)
  • X-DNA – Total cM and Largest segment

Report Filtering & Sorting

  • Sort any column into ascending or descending order by clicking on the little up-down arrows in the column headers; Try sorting by Largest Segment; Sort by Age to see your newest matches; Sort by X-DNA Total or Largest Segment; Sort by Testing Company, Haplogroup, Sex or GED/WikiTree; Sort by email address to locate matches with the same admin (also see User Lookup below), or identify which of your own kits match another kit that you are looking at.
  • Tier 1 subscribers can enter characters into the box at the top of any columns to filter results; enables useful filtering on names, email addresses, testing companies, haplogroups (eg. type the first letter or two of any known haplogroups in your pedigree), filter by sex (eg. X-matches), and more.
  • Search for particular names, aliases, or email addresses.  Eg. search for your surname or spelling variations, a friend or relative’s email address, AncestryDNA usernames, haplogroups that match yours, kit numbers, search for character strings in email addresses, such as: ‘bigpond’, ‘optusnet’, ‘iinet’, ‘tpg’, ‘.au’, ‘.nz’, ‘.uk’, ‘.ie’, ‘btinernet’.
  • Increase the match limit before running, then combine Sorting with Filters – your imagination is the only limit!

Match Thresholds

There are two measures to determine if a DNA match is genealogically-relevant: cMs (centiMorgans) and SNPs (pronounced ‘snips’: see ISOGG Wiki Genetics Glossary).

The way I explain it to beginners is:  “CentiMorgans is a bit like measuring a length or distance between Point A and Point B, whereas the SNPs is the number of stops or locations examined along the way from Point A to Point B.  The more stops that are made along the way to check matching, the more accurate/confident the measurement will be.  Too few checks along the way can reduce confidence as to what is really in-between Points A and B.  Then there’s also Imputation to consider, which is using the results of some of the SNPs to predict others near them that haven’t been examined, because there’s a predictable association or linkage between them.”

  • To be genealogically-relevant, a match should normally share a segment of DNA that is at least 7cMs and 700 SNPs.  It is recommended to look at larger segments such as those greater than 15-20cMs, as there will be more chance that the Most Recent Common Ancestor (MRCA) will be within the time frame of genealogical records.
  • The One-to-many matches list uses a default of 7cMs, but does not show the SNPs.
  • Once you have identified an interesting match in the One-to-many DNA Comparison report, click on the blue ‘A’ (in the Basic version results) or click on the blue atDNA Largest Segment amount (in the Beta or Tier 1 version results) to run a One-to-one Autosomal DNA Comparison report, or access the report directly from the Dashboard and enter the relevant kit numbers.  Beta or Tier 1 users can also click on the blue X-DNA Largest Segment amount to run a One-to-One X-DNA Comparison.
  • The default thresholds for the One-to-one comparison report are 7cMs and 200-400 SNPs (default varies dynamically), but these can be reduced to look for segments that may be just below the thresholds.  Avoid reducing thresholds unless you have already confirmed the connection through testing other relatives (eg. several siblings match but one doesn’t) and/or through genealogical research.  Don’t try to force matches that may not be real or are far too distant.  Concentrate on your closest matches first.  Encourage other relatives to test, which will give you useful matches that will help you identify shared matches. Warning: if you lower the thresholds enough, you will match with almost anyone you want to match!

One-to-Many X-DNA Comparison

The One-to-Many Original report does not include any X-DNA information, so you’ll need to use the One-to-Many Limited version.  Although the One-to-Many Limited report  includes X-DNA columns and you can sort by total cM or largest segment for X, it focuses on autosomal DNA (chromosomes 1-22) matching so is only showing you X-DNA match information for your closest autosomal DNA matches.

To see your highest X-chromosome matches regardless of whether they share any autosomal DNA with you, use the same One-to-Many Limited report but change the selection from Autosomal to X before you run it.

Be aware that you will need to match on quite a large segment of the X-chromosome to be genealogically useful, as X-DNA can be passed intact through female > male > female generations, so it may originate from much further back than you might expect.

X-matches in combination with atDNA can potentially help you identify which ancestral line you connect on.  Males can only inherit X-DNA from their mothers.  All daughters from the same father will have one whole matching X-chromsome.  Some 3rd and more distant cousins won’t share any autosomal DNA with you, but you may still share some X-DNA.  Be aware that sometimes the X-DNA can come from a different ancestor than the atDNA.  And sometimes very close relatives won’t share any X-DNA with you either!

Before analysing X-matches, make sure you understand X-DNA’s helpful inheritance patterns.  Lists of resources on the X-chromosome and X-chromosome testing are available in the ISOGG Wiki.

One-to-One Autosomal DNA Comparison

When you have found an interesting match in your One-to-many results, or want to compare your DNA to someone else’s kit, run the One-to-one Autosomal DNA Comparison report.

You can access this report directly from the GEDmatch dashboard, or you can click the blue ‘A’ next to the kit in your One-to-many basic report or click on the blue cM in the One-to-Many Beta report, and it will open in a new tab on your browser.

Simply enter the two kit numbers, leave the defaults as they are, and click Submit. Note that you can choose to view just the matching positions, the graphics (chromosome browser) or both.

This report shows you which segments of autosomal DNA (chromosomes 1-22) you share with your match.  It produces a list of the chromosomes and the location(s) on the chromosomes.

If run at the default thresholds, the text at the bottom of the report will include the estimated number of generations back to your Most Recent Common Ancestor (MRCA), as well as the total cMs shared and the largest segment shared.

One-to-one-Positions

Use the relationship calculator to explore potential relationships for the total cM.

Note that you can choose to show the results in table format (as above), graphic bars (chromosome browser) or both together (example below):

One-to-one-both-output

One-to-One X-DNA Comparison

The One-to-One Autosomal DNA Comparison (above) does not include the X-chromosome (ie. chromosome 23), so you will need to run the One-to-One X-DNA Comparison to analyse X-chromosome matches.

Remember that X-chromosome inheritance is different to regular autosomal inheritance.  Review X-DNA’s helpful inheritance patterns so you understand the basics and know how to make the most of X-matches.

One-to-one-X-chromosome

People who match both or 1 of 2 kits - ie. Shared Matches

This report lists details of people who match both or one of two kits.  It is similar to the ICW (In Common With) and NICW (Not In Common With) tools in Family Finder, and Shared Matches at AncestryDNA, MyHeritage DNA and 23andMe, which identify the matches you share in common with (or not in common with) another person.  Just remember that although the kits may appear in both of your match lists, they may share different segments of DNA and you may relate to them through different ancestors.

Enter your kit number and another kit number to see a list of kits that match both of you, or one but not the other. This report is very handy for finding who else might be related to you on a particular branch.  For instance, enter your kit number and that of a known cousin, and the resulting list could include relatives who descend from or above the same ancestral couple that you share with your cousin.  You will still need to run One-to-One Autosomal DNA Comparison to make sure they match each other on the same segment, but this is a starting point in finding relevant matches to compare.

The shared matches list will be shown first (example below), followed by a list of kits matching Kit 1 but not Kit 2, and a list of kits matching Kit 2 but not Kit 1.

The latter lists can be useful where you have tested one parent, but want a list of all your matches who don’t match that parent (ie. that may match you through your other parent).

If you have tested yourself at more than one company, you can compare two of your own kits to identify differences in matches from each test (note that it is GEDmatch user etiquette to only have one of your own kits set to Public, and mark any duplicates as Research to avoid copies clogging your matches’ reports and wasting GEDmatch resources).

People-match-both-or-one-of-two-kits-without-Tier-1.png
Free version - People who match both kits, or 1 of 2 kits

The report shows kits that match both people, including shared DNA cMs, estimated number of generations back to the Most Recent Common Ancestor (MRCA), name and email address.

Scroll further down the report to view two further sections: a list of matches to Kit 1 but not Kit 2, and a list matches to Kit 2 but not Kit 1 (ie. Not In Common With).

Tier 1 subscribers will see an extra column, for kit selection (see below).  If you’d like to compare any of these kits to each other, you can tick 2 or more of the checkboxes in the Select column then click the Submit button (just above the first column heading) to run a selection of cross-kit visual analysis tools.

People-match-both-or-one-of-two-kits
Tier 1 version - People who match both kits, or 1 of 2 kits

2D Chromosome Browser

The 2D Chromosome Browser will display both a data table and a graphic bar for each chromosome where your selected kits share DNA.  Below the example just shows one chromosome.

When you select kits for this report, they will be shown compared to the first kit in the list, or the kit for which the One-to-many matches report was run.  The row numbers in the graphic bar match the kit numbers in the table.

Note the colour coding legend. Small segments under 5cM are hot pink and easy to spot and ignore, whereas the larger more relevant segments (eg. green, yellow, orange, red) are easy to identify.

When selecting multiple kits, for example from your People who match one or both of 2 kits report, scroll down the graphic bars looking for groups of large overlapping segments of DNA.  Note the kit numbers of those who overlap each other, and do further one-to-one comparions on them to determine which kits all match/overlap each other on the same segment, as these are the ones that may be related through the same set of common ancestors.

3D Chromosome Browser

The 3D Chromosome Browser allows you to visualise segments shared by multiple DNA kits with each other, by chromosome.  Enter between 3 and 10 kit numbers, then click Display Results.

You will be presented with a page of tables detailing the shared DNA of the selected kits.  An example of the Autosomal DNA Comparison Matrix is shown below.  Another matrix compares X-DNA, and other tables list the number of segments in common, a summary by chromosome, and all shared segment details.

3D Chromosome Browser - Autosomal DNA Comparison Matrix

Select the Click HERE button at the top of the page to go to the 3D Chromosome Browser.  Select the chromosome numbers from the drop-down at the top left, and drag the X-axis and Y-axis sliders to rotate the browser to a suitable viewing angle.  Kit numbers and names/aliases are displayed on the left, and the red dots intersecting on the matrix show where two kits overlap on the same segment.  This tool can save you running One-to-One reports on multiple individual kits to see if they each share with each other on the same segment.

Compact Chromosome Browser

The Compact Segment Mapper enables you to visualise the segments that one person shares with a number of other matches.  Each person is represented by a different colour in the compact browser.  Select several kits from the One-to-many matches report, from the People who match both or 1 of 2 kits report, or via the Multiple Kit Analysis.  Click Visualisation Options, and then select Compact Mapper.

Archaic DNA Matches

Have some fun comparing your DNA with ancient samples.  Run the Archaic DNA Matches report to display your ‘heat map’, and see if your kit produces any mostly-orange rows, and also check the red & blue heat map row at the bottom, which identifies segments that match across multiple kits.  Then run One-to-one Autosomal DNA Comparison reports on the individual archaic kit number samples, which are available from the left column of the heat map itself, and listed with additional details on Felix Immanuel’s website (www.y-str.org/p/ancient-dna.html).

Ancestor Projects

Ancestor Projects provides unique applications designed for groups of 20 or more GEDmatch kits with something in common – perhaps a large family group, a shared surname, a geographic origin, trait or other characteristic.

Click the Ancestor Projects link on the Dashboard to view the current groups, and the application instructions if you have a group that may benefit:

GEDmatch Ancestor Projects page

DNA File Diagnostic Utility

Most users only look at the DNA File Diagnostic Utility if they have problems uploading a kit, but it is interesting to see what it contains.  This utility reveals the upload details, number of matches, and SNPs counted on each chromosome.  Run it for your kit and see what it contains.

Diagnostic-Utility

Tier 1 Tools

Once you become familiar with the free GEDmatch utilities, consider paying the US$15 required to access the GEDmatch Tier 1 tools for a month, or save by subscribing for a year for US$100.  Once you subscribe, the Tier 1 section of your GEDmatch Dashboard will become active (no longer greyed out), containing additional reports and utilities that you can take advantage of.

I will look briefly at a few of the Tier 1 utilities below, but if you’ve made it this far down this long blog post, you will be capable of experimenting with them yourself.

Multiple Kit Analysis

As well as selecting kits for cross-kit visual analysis directly from the One-to-Many Autosoma DNA Comparison reports or the People who match both or 1 of 2 kits report, you can select up to 500 kits for visual comparison using this Multiple Kit Analysis tool.  It is not always possible to select all the kits you need from the first two mentioned reports, as sometimes one sibling or cousin doesn’t match the others so cannot be included/selected.

With this option there are no limitations – you can select any kit you like.  Simply enter the desired kit numbers, click Submit, and then you can select from the cross-kit visual analysis tools.  You can also select Tag Groups (read more about Tag Groups).

Phasing

If you have tested one (or both) of your parents as well as yourself, you can phase (separate) your kit into two parts – a maternal kit (M1) and a paternal kit (P1).  These new kits will be added to your list of kits on your GEDmatch dashboard. Run your phased kits to significantly reduce the number of false matches obtained from your own kit, as many false or IBC segments will be eliminated.

Phasing is also useful where you can only test one parent (eg. if the other parent is deceased).  Simply enter your kit number and your tested parent’s kit number, and this tool will create a half/partial kit for your other parent’s DNA.  You only inherit 50% of each parent’s DNA, so you can only get a kit with 50% of your non-tested parent, but at least you can use that kit in other GEDmatch tools, such as the One-to-many DNA Comparison report, People who match both or 1 of 2 kits, etc.

For more information, articles and references on phasing, refer to the ISOGG Wiki.

My Evil Twin

Because you only inherit 50% of your DNA from each of your parents, that means you do not inherit any of the other 50% from each parent.  If you have tested both parents, this tool effectively subtracts what DNA you got from them, to create a new kit that contains the DNA you didn’t inherit from your parents… ie. your evil twin… everything that you are not!  You can then run your evil twin’s kit to look for matches, etc… just a bit of fun, and educational!

Upload your Gedcom Family Tree file

I’ve noticed a lot of confusion between the words ‘GEDmatch’ and ‘Gedcom’, and you do need to understand the difference to avoid confusing yourself and others:

  • ‘GEDmatch’ is the name of the entity/website providing these wonderful utilities.
  • A ‘Gedcom’ is a type of file format that stores a family tree, and this file can be uploaded and downloaded between different types of family tree software on desktop computers and online trees.  So if you have an online tree on Ancestry, you can download a copy in Gedcom format (.ged), save it to your computer, then upload that Gedcom file to GEDmatch for others to search.  You can also import that Gedcom file into desktop software such as Legacy, make changes, save it as a new Gedcom file, then upload it to GEDmatch or elsewhere.

Once you have a Gedcom file of your family tree, simply click one of the Gedcom Genealogy Upload links at the top right of the GEDmatch dashboard, and follow the instructions.  Further information is available in the GEDmatch Wiki, so please check that if you are unsure of anything.

You can pin your DNA kit to a person in your tree.  You can search by name, place and other variables.  You can view pedigrees and descendants.  You can look for matches to your Gedcom. And you can check the User Lookup to see if any of your kit matches have uploaded a tree.

Gedcom Family Trees searches

  • 1 GEDCOM to all – compares one Gedcom to all the other Gedcoms in the database, looking for matches to names, dates and places.
  • 2 GEDCOMs – compares two Gedcoms and finds matching names, dates and places.
  • Search all GEDCOMs – allows you to search all Gedcoms using a range of search variables.
  • GEDCOM + DNA matches – lists all Gedcoms linked to kits that match your DNA.

When you click on people in your own tree, you can easily change who you link your DNA kits to (see image below).  Note the coloured double-helix icon that indicates a DNA kit is linked to that individual.  When on the Individual view, for any person, note the text links at the top (highlighted), as they are the links to the pedigree and descendants details.  The Search link takes you to a general gedcom search.

Below is an example of a Pedigree view.  Note the Home, Pedigree, Descendants, and Search links at the very top.  You can change the number of generations visible, and you can click on any arrows (visible to the right of some individuals) to go to their extended pedigrees.

These Gedcom tools are terrific, and I’m sure once you start you will spend many hours searching, comparing, and working up and down the trees, so do give them a go.

When you use the Gedcom comparison tools, if you find matching persons you can click on a link to ‘confirm’ them.  This adds a little green tree icon to the name in both your tree and the matching Gedcom tree.  If you come across a green tree icon, click on it to list other Gedcoms that include that person.

Refer to Kitty Cooper’s post on Using the Gedcom capabilities at GEDmatch for instructions.

Segment Search

Segment Search – allows you to search for kits with matching segments to yours.  You can search for segment matches on one specific chromosome, or all chromosomes at once.  The report provides a list of matching segments for each chromosome, with an optional graphic.  It helps identify which kits overlap on the same segments, and is also useful for providing data to some third party tools.  The image below shows an extract of the output.  The report is run for one kit number, and it lists rows of information on other kit numbers that match on the same chromosome.  You can select rows to use in the Multi Kit Analysis, and you can download all data to a CSV file.

Triangulation

Triangulation compares your top 500 One-to-many matches with each other and generates a report containing details of all those who match you and each other on the same segment.  Triangulations are groups of three: you and two others.  The graphics display is option, and below the main report is a separate listing of match details by kit number.  This report is useful for identifying matches who may descend from the same ancestor.

Lazarus

Lazarus enables creation of a surrogate DNA kit of a deceased person by combining the DNA of a selection of descendants and other relatives.  Refer to The Genetic Genealogist’s post Recreating a Grandmother’s Genome Part 1 and Part 2, and Roberta Estes’ Putting Humpty Dumpty Back Together Again.  Facebook users interested in experimenting with the Lazarus tool should join the GEDmatch Lazarus Tool group.

Combined Kit

If you have tested at more than one company, you can combine up to 4 of your DNA kits to create one Superkit.  I have combined my AncestryDNA, Family Tree DNA, 23andMe and Living DNA kits, so I now have one superkit.  I could potentially include my MyHeritage DNA kit as well, by combining that with the previously created superkit.  The diagnostic reports shows my Superkit contains nearly 1.2 million useable SNPs, whereas the individual kits have between 500,000 and 650,000.  Combined kit numbers end with C1.  Only the combined kit will show as matches to other users.  Check Kitty Cooper’s review of her combined kit.

Auto-Clusters

Try GEDmatch’s basic Auto-Cluster feature to automatically sort 500 of your matches into groups highlighting those who share with each other.  You can adjust the upper and lower cM thresholds, and you can order the report in different ways.  The matches are hyperlinked through to the User Lookup and to the One-to-one Autosomal DNA Comparison entry form.  Note: This is a Tier 1 feature.

Clusters-of-Shared-Matches

User Lookup

This is such a useful but under-utilised tool, and many people don’t even realise it is there.  You will find it very useful for finding out more about a kit, a user, a Gedcom file.  And it can solve lots of puzzles.  Just remember to only enter information into ONE box for each search.

  • Run the User Lookup tool on a kit number to see if the match has a Gedcom family tree file uploaded to GEDmatch, which you can browse through looking for familiar names and locations.
  • Run the User Lookup tool on the email address to see if the user has multiple kit numbers (ie. other relatives you can analyse) or a Gedcom family tree file linked to another kit they manage.  Sometimes a user has only one Gedcom file uploaded, but several different kits are linked to individuals in that one Gedcom tree.
  • If you forget a kit number for a contact, run the User Lookup on their email address.  The email address usually populates automatically if it has been used before in the same browser, so you usually only need to remember the first one or two characters.
  • Run the User Lookup tool on a Gedcom Id that you find in one of the Gedcom reports, to find the kit number and/or email address when they can’t be found in the tree.
  • When I receive email enquiries from beginners who neglect to tell me their kit number and/or which of my kits they match, I enter their email address into the User Lookup tool to find their kit number (they usually only have one kit, otherwise they would realise the importance of providing such information).  I then run a One-to-many DNA Comparison report on their kit number, then use my browser search function (Edit > Find) or the Tier 1 filter on the email address column, to search for my own email address.  Within moments I have found which kit of mine they match, and can click on the ‘A’ next to the kit to run a One-to-one comparison, a People who match on both or 1 of 2 kits report, followed by any other analyses required on their kit before responding to them.  It is quick to do, it can save a lot of time in emails going back and forth simply to learn the kit number, and the new user is usually very appreciative of what they learn once I reply.

GEDmatch Profile & Detailed Kit Information

This feature is listed under the Information section near the top of your dashboard, and is called GEDmatch info about you.  Click to have a look at the detailed information on your profile and all the DNA kits you have in your GEDmatch account:

Click image to enlarge

GEDmatch Forums

GEDmatch Forums are back, so you can now ask questions, read discussions and submit suggestions for any of the utilities.   Boards are organised into GEDmatch features, so check you have the right board before posting.

Try the Advanced Search to look for posts on topics or by authors that might interest you…

You can edit your Forum profile, send messages to other users, see who is online (and edit your own online visibility settings) and make use of many other forum functions.

GEDmatch Wiki

GEDmatch’s Wiki provides basic information on the most popular tools.  The link to the Wiki is under the Information section towards the top right of GEDmatch’s home page.

Educational Videos

In addition to the YouTube videos in GEDmatch (see Information on the home page), search the Legacy Family Tree Webinars library for ‘GEDmatch’.

As well as an Introduction to GEDmatch by Blaine T Bettinger, you’ll find GEDmatch Segment Search Tool (Tier 1) by Michelle Leonard and you can Watch Geoff Access GEDmatch Live (this one was from 2016 so the user interface has changed a little, but the basic tools are still the same).

Reminder

GEDmatch is a supplement to your testing company, not a replacement.  Don’t forget to learn to use the range of tools and features offered by your testing company, as well the additional tools at GEDmatch.  Even if you don’t want to use the GEDmatch tools, consider opting in to law enforcement matching so your DNA can help identify human remains and solve cold cases.

If you found this very detailed post useful, please share it with others who might need some help getting started with or understanding GEDmatch basics.  The more people that upload their data and learn how to use the basic features, the more productive it will be for all.

Facebook
Twitter
LinkedIn
Pinterest
Email

First published 11 Dec 2015;  Last updated April 2023.

One Response

Leave a Reply

Your email address will not be published. Required fields are marked *